Sunday, August 30, 2015


   Not everyone wants to watch a full video, link to the exact location you found most entertaining instead of making your friends or family watch the full video. To do this get to the location you want and pause the video. Once paused right-click the video and select Get video URL at current time and then copy the link created.

   Alternatively you can manually add the time by adding "#t=XXmXXs" at the end of the URL, where XXm is the minutes, and XXs is the seconds into the video you want to start. For example:

https://www.youtube.com/watch?v=MKVWBUwoV4o
 would become

https://www.youtube.com/watch?v=MKVWBUwoV4o#t=33s
to link to the video 33 seconds into the video. If you wanted to link 4 minutes and 20 seconds into a video add #t4m20s to the end of the URL. Alternatively you can use only seconds, so 4 * 60 (seconds in a minute) = 240 + 20 = 260 seconds for 4 minutes and 20 seconds into the video.

Tuesday, August 18, 2015


All-in-one repair tool to help fix a large majority of known Windows problems including registry errors and file permissions as well as issues with IE, Windows Update, Windows Firewall and more.


Sunday, August 16, 2015


During your browsing  in Google Chrome, Firefox or any other browser, you may face some strange errors , the most famous one is DNS_PROBE_FINISHED_BAD_CONFIG error. The error Stops you from accessing Web Pages like Facebook, Gmail or Google.com itself. This Error in your Browser Points out that DNS lookup Failed while loading the webpage for you.

It doesn’t matter which Windows Version you are using, This is a Internet Connection Error and is displayed in Browser. This Bad_Config Error is gaining Popularity in recent times as more and more people are getting it. But Today We will Show you 3 Ways to Fix DNS_PROBE_FINISHED_BAD_CONFIG error.

So in this post i will be Sharing 3 different ways to Solve this issue. After Which you will be able to Surf Internet and Open Sites easily just like before.


Method 1: Release/Renew Ip Address.
In this Method, you will be releasing your ip address and then renewing it again. If the Problem is with your IP address then this method should work for you. Just Follow the Below Simple Steps.

Step 1: Open Command Prompt(cmd) By Pressing Combination of Windows key + R to open run. Now type in “cmd” and Hit Enter.

Alternatively, you can Press Windows Key + X , then Click on Command Prompt (Admin).

Step 2: Now that your Command Prompt is ready, Type in ipconfig /release then hit enter.

Step 3: Now again type in ipconfig /renew and hit enter. This will Renew your IP address.

Step 4: Close the Command Prompt and open your Favorite Browser to Check if the Problem is solved.


Method 2: Flushing DNS.
  • In This Method We will Be Flushing DNS to Solve Error Code: DNS_PROBE_FINISHED_BAD_CONFIG. This will Most Probably Solve the issue if the Problem is in your DNS Cache. Follow below Steps.

  • First of all Open Command prompt.
  • No type in “ipconfig /flushdns” without Quotes and hit Enter.
  • You can see your dns is succuessfully Flushed.
  • Open your Browser and see if the issue is still there or you have now fixed it.
Alternatively instead of ipconfig /flushdns you can also type “netsh winsock reset catalog” and see if that works. Move on to the Next and Final Method if this doesn’t help.


Method 3: Tweaking DNS Settings.


If both of the above method didn’t helped you to fix DNS_PROBE_FINISHED_BAD_CONFIG error then Use this method. It Requires you to do minor Tweaking in your DNS Settings But In most cases this fixes the issue if done correctly. Follow the below Explained Steps.

  • Right Click on Network icon in taskbar then click on Open Network and Sharing Center.
  • Now from the Left pane, find and Click Change Adapter Settings. This will Open up Network Connections.
  • You will be presented with a new window with all Network Connections, Right Click on Active Connection and select Properties.
  • Now look for Internet Protocol Version 4 (TCP/IPv4), Double Click on it to open its Properties.
  • In the Properties Window, Click on Use the Following DNS Server Addresses and Type in 8.8.8.8 in Preferred DNS Server and 8.8.4.4 in Alternate DNS Server Just like shown in Below Picture. Then Click on OK.

Now Open your Browser and you will see that you have successfully Fixed Error Code DNS_PROBE_FINISHED_BAD_CONFIG now.

Now you can continue your browsing without ant problem :) .. Hope you enjoy and dont forget to visit our page on facebook Smart Computer Tricks

Friday, August 14, 2015


Many of users want to sell their laptops and External hard-disks after period of time but the biggest threat for them is the Recovery Programs like "Recovery my files". so the bad use of this programs by the buyer or the new users of this HD cause a problem to the first user like recovery his photos, videos, documents, even his passwords. so to prevent threats like this,we advise our reader to use wiping programs like DBAN.


DBAN is free erasure software designed for the home user. The program is designed to securely erase a hard disk until its data is permanently removed and no longer recoverable, which is achieved by overwriting the data with pseudo-random numbers generated by Mersenne twister or ISAAC.

DBAN can be booted from a CD, DVD, USB flash drive or diskless using a Preboot Execution Environment. It is based on Linux and supports PATA (IDE), SCSI and SATA hard drives.

 DBAN can be configured to automatically wipe every hard disk that it sees on a system or entire network of systems, making it very useful for unattended data destruction scenarios.

DBAN, like other methods of data erasure, is suitable for use prior to computer recycling for personal or commercial situations, such as donating or selling a computer.

DBAN users should be aware of some product limitations, including:
  • No guarantee of data removal (e.g. DBAN does not detect or securely erase SSDs)
  • No audit-ready reporting for regulatory compliance
  • Limited hardware support (e.g. no RAID dismantling)
  • No customer support or regular software updates


Wednesday, August 12, 2015


Windows Task Manager is used to view details about processes running on your computer. Since it can be used to terminate programs that are misbehaving or are viruses disguised in the form of harmless programs, most spyware and viruses disable it to prevent themselves from being closed through it. Some administrators also disable Task Manager to prevent users from closing important security programs like antiviruses and anti-malwares.

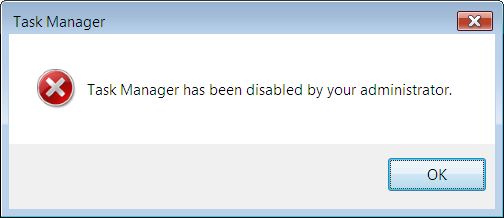
In such situations, running the Task Manager will give the "Task Manager has been disabled by Administrator" error. 

However, there are some techniques you can use to re-enable task manager and close those harmful programs manually. This article contains few such simple techniques you can use to regain access to Task Managing privileges.

- Enable Task Manager from Registry in Windows 8, 7, XP or Vista
Registry Editor is an inbuilt Windows tool that is used to modify registry keys which tell Windows how it should work. A simple registry modification can be used to bypass the Task Manager block. To do so, just follow the steps:-

  1. Click on Start. Go to Run. If you use Windows 8, Windows 7 or Windows Vista, go to Search.
  2. Type regedit and press Enter. Registry Editor will start. If Registry Editor is also disabled, you will first need to enable registry editing.
  3. Through the left hand navigation pane, navigate to HKEY_CURRENT_USER\Software\Microsoft\ Windows\ Current Version\Policies\System. If the System key is not there, you will need to create it.
  4. In the work area, locate "DisableTaskMgr". If this value is not there, you will need to create a new DWORD value called DisableTaskMgr. Double click on it. A window will pop up.
  5. Enter its value data as 0 and press OK.

Now close Registry Editor. If Task Manager is still disabled, restart your computer.
Enable Task Manager from the Group Policy Editor (Gpedit.msc)

Group Policy Editor is a feature in Windows which is used to edit local policy settings. It can also be used to enable Task Manager. To do so, just follow the steps given below:-

  1. Open Start Menu. Windows XP users click on Run. Windows 8.1, Windows 8, Windows 7 and Vista users, go to Search.
  2. Type gpedit.msc and press Enter. Group Policy Editor Window will show up.
  3. From the navigational pane at the left hand side, go to: User Configuration>Administrative Templates>System>Ctrl+Alt+Del Options.
  4. In the work area, double click on "Remove Task Manager" and set its value to Disabled or Not Configured.
  5. Restart your Computer or Log Off and Log back On to apply the changes.Group Policy Editor is not available on home editions of Windows.


Enable Task Manager by Running a CMD CommandCommand Prompt can also be used to directly enable Task Manager. 

  • Open Notepad.
  • Copy the code given below and paste it.
REG add HKCU\Software\Microsoft\Windows\CurrentVersion\Policies\System /v DisableTaskMgr /t REG_DWORD /d /0 /f
  • Save the File as TaskManager.bat.
  • Run TaskManager.bat as Administrator if you use Windows 8, Windows 7 or Windows Vista. In Windows XP, simply open the file. A command prompt window will flash for a second and then disappear indicating successful execution. After running the batch file, you will be able to again use Task Manager. If Task Manager is still not available, restart your computer.
Create a Registry(.reg) file for enabling Task ManagerIf you are unfamiliar with manually editing the Registry, you can create a Registry file which will automatically modify the Registry Key to re-enable Task Managing. To create one such file:-

  • Open Notepad or any other text editor.
  • Copy the code given below and paste it as it is in it.
Windows Registry Editor Version 5.00 [HKEY_CURRENT_USER\Software\Microsoft\Windows\CurrentVersion\Policies\System] “DisableTaskMgr” =dword:00000000
  • Save the file as Enable Task Manager.reg or *.reg.
  • Open the file by double clicking on it.
  • Registry Editor will ask you for confirmation. In the confirmation Window, click Yes.
Task Manager would immediately be accessible. If it is not, restart your computer.The techniques mentioned in this article work on Windows 8.1, Windows 8, Windows 7, Windows XP and Windows Vista. 
Dont forget to like us on facebook, wish you all the best guys and see you later with a new trick. bey bey :)

Monday, August 10, 2015


With this trick, you can make your Computer welcome you in its computerized voice. You can make your Windows based computer say "Welcome to your PC, Username."

Make Windows Greet you with a Custom Voice Message at Startup

To use this trick, follow the instructions given below:-


1- Open Notepad then Copy and paste the exact code given below.

Dim speaks, speech
speaks="Welcome to your PC, Username"
Set speech=CreateObject("sapi.spvoice")
speech.Speak speaks

2. Replace Username with your own name. 

3. Click on File Menu, Save As, select All Types in Save as Type option, and save the file as Welcome.vbs or "*.vbs".

4. Copy the saved file. 

5. Navigate to C:\Users\ {User-Name}\AppData\Roaming\Microsoft\Windows\Start Menu\Programs\Startup (in Windows 8, Windows 7 and Windows Vista) 

if C: is your System drive. AppData is a hidden folder. So, you will need to select showing hidden folders in Folder options to locate it.


6. Paste the file.


Now when the next time you start your computer, Windows will welcome you in its own computerized voice.

Note: For best results, it is recommended to change sound scheme to No Sounds.
You can change the sound scheme to No Sounds by following the steps given below:-

- Go to Control Panel.
- Then click on Switch to Classic View.
- Then Click on Sounds and Audio Devices.
- Then Click on the Sounds Tab.
- Select No Sounds from the Sound Scheme option.

Try it yourself to see how it works. In my personal opinion, this is an excellent trick. Whenever I start my PC in front of anybody and the PC welcomes me, the fellow is left wondering how brilliant a computer do I have.

Sunday, August 9, 2015


The Undo Send feature is an official part of Gmail So let's see how the feature works:

1- First, log in to your Gmail account on your computer.

2- In the upper right corner of the screen, click the Settings icon (the one that looks like a gear).

3- From the Settings menu, choose the option for Settings.

4- From the Settings window, make sure the General tab is selected.

5- Look for the setting that says Undo Send.

6- Click the check box to Enable Undo Send.

7- Click the drop-box to set the Send cancellation period, meaning the number of seconds you have to prevent the email from being sent. You can choose 5, 10, 20 or 30 seconds.

8- Scroll to the bottom of the Settings screen and click the Save Changes button.


To test the feature, click the Compose button at the upper left corner of your Gmail account page.
Compose a message and then click the Send button.

At the top of the screen, you'll see a message that says: "Your message has been sent. Undo. View Message."To prevent the message from being sent, click the Undo link.


Gmail stops the message from going out and displays it in case you wish to make any changes and then resend it. If not, you can simply close the message, and it's relegated to your Drafts folder where you can keep it or delete it.


The Undo Send feature is a handy way to ensure that the wrong email doesn't get sent to the wrong person.